
Marvelous Mint Chocolate Brownies!
December 16, 2009 by GradingGirl
Filed under Recipes, School's Out
Who doesn’t love brownies?! I’m kind of famous for these at work. If I don’t make them at least twice a year, I lose tenure! 🙂 My dear friend, Mary, gave this recipe to me years ago back when we were next-door neighbors. I’ve been making them ever since. WARNING: These are ooey, rich and gooey – addiction is imminent.
I apologize to my clean-eating followers. This is NOT an eat-clean dessert. Hey, we have to splurge once in a blue moon!
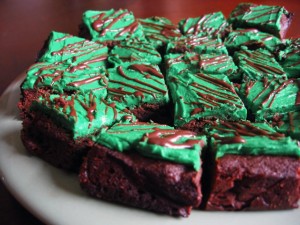
Mint Chocolate Brownies!!!
These are richly delicious!!! Make them for Christmas & St. Patrick’s Day!
Ingredients ~
* Brownie Mix
* 1 ½ stick butter (I use unsalted)
* 3 Tbs. Crème-de-Menthe
* 2 Cups Powdered Sugar
* 1 Cup Chocolate Chips (or Mint Chocolate Chips)
* 1 package Andies thin mint candy
Brownies:
Bake and cool your favorite brownie mix according to package instructions. (13 x 9 pan) I like Duncan HinesCool completely before spreading the crème-de-menthe layer. DO NOT CUT.Crème-de-menthe layer:
Beat ½ cup room temperature butter. Add 2 cups powdered sugar and 3 Tbs. green crème-de-menthe liquor. Spread over brownies. Let this set before spreading the chocolate glaze.Chocolate glaze:
Stir 1 cup semi-sweet chocolate chips (or mint chocolate chips for more mintness!) and 6 tbs. butter in a saucepan over low heat until melted and smooth. COOL. Pour over crème-de-menthe layer and spread evenly.Before glaze sets, sprinkle with coarsely chopped Andies candy. Enjoy!!
Good Dessert, Bad Dessert
November 15, 2009 by GradingGirl
Filed under Recipes, School's Out
I made this last night for tonight’s dessert. It is actually good for you while tasting indulgently yummy! I can’t take the credit for this concoction. I stumbled upon the recipe in the November/December 2009 issue of Clean Eating – GG’s favorite cooking magazine, by the way!!! It took me all of five minutes to mix all the ingredients in my blender. This is my “good dessert” for the evening:
Spiced Pumpkin Mousse
Serves 10 (I cut this recipe in half.)
This luscious dessert contains 35% of daily rec for manganese and 15% for fiber!
- 2 15 oz. cans 100% pure pumpkin purée (not pumpkin pie filling)
- 1 1-lb pkg silken tofu, drained well
- 1/2 cup pure maple syrup (I used sugar-free)
- 1 1/2 tsp cinnamon, ground
- 3/4 tsp ginger, ground
- 1/4 tsp nutmeg, ground
- 1/4 tsp cloves, ground
- 1/4 tsp sea salt (I eliminated this ingredient)
- 1/2 cup nonfat plain Greek-style yogurt (I used my very fave 0% Fage!)
- 1 oz dark chocolate, cut into thin shards
In the bowl of a food processor (I used my blender), combine pumpkin and tofu. Process until combined, about 30 seconds. Add maple syrup, cinnamon, ginger, nutmeg, cloves and salt. Process until combined, about 30 seconds more.
Transfer mousse to a resealable container, cover and refrigerate for at least 4 hours.
Drain any water that has accumulated from mousse. Give it a quick stir and scoop 1/2 cup mousse into each of 10 small glasses or ramekins. Top each serving with 2 tsp yogurt and 1 tsp chocolate. Keep refrigerated until ready to serve. (for those extra sweet tooths, fat free Cool Whip works well too)

This tastes like a very gooingly good pumpkin pie without the crust and more of the scrumptious filling!!
Now, my daughter’s palate does not yet appreciate consistently clean eating as I’ve grown to love; her younger metabolism can afford more cheats. Soooo . . . being the wanting-to-please everyone cook that I strive to be, I’m making this “bad dessert” tonight as well:
Thank you to my very kitchen-capable bro who introduced me to this easy sweet treat!
Pizzookies!
Serves 4
- 1 package Nestle Toll House Chocolate Chip Cookie Dough
- Vanilla or Caramel Cheesecake ice cream
Place the cookie dough as one sheet in an 8 X 8 pan. Bake according to package directions.
Immediately warm out of the oven, divide the cookie into four parts. Place each warm “cookie” in a large bowl. Scoop the ice cream on top and serve immediately! Hmmmmmm . . . . .

Cookies that Won’t Turn You Into a Pumpkin
October 19, 2009 by GradingGirl
Filed under Recipes, School's Out
This is one of my favorite desserts of the fall and winter seasons. Pumpkin is so good for you! Not only is pumpkin loaded with vitamin A and antioxidant carotenoids, but it’s also a good source of vitamins C, K, and E along with lots of minerals including magnesium, potassium, and iron. Wooo . . . that’s alot of punch to this bright orange veggie. My mom has been making these cookies for as long as I can remember; she, however, makes the delectable original version. Here’s my slightly “doctored,” eat clean version that tastes just as sinful. I’ve included the original as well.
Old Fashioned Soft Pumpkin Cookies
- Mmm, one of my faves of the season!
- 1 tsp baking powder
- 1 tsp ground cinnamon
- ½ tsp ground nutmeg
- 1/4 tsp salt
- 1/2 cup butter, softened (2012 update: my bro used pumpkin butter which made the cookie denser)
- 1 can (15 ounces) pumpkin
- 1 1/2 cup sugar
- 2 egg whites (original 1 egg)
- 1 tsp vanilla
Combine flour, baking soda, baking powder, cinnamon, nutmeg, and salt in a medium bowl. Mix butter, pumpkin, egg and vanilla in another bowl. Beat until light and creamy. Mix dry ingredients until well blended with the pumpkin mixture.
Drop by rounded tablespoons onto a greased cookie sheet. Smooth tops of cookies.
Bake at 350 degrees for 15-20 minutes.
Cool on wire racks.
**Drizzle with your favorite homemade vanilla frosting recipe.
( I combine skim milk (about ½ cup), butter (about 2 tbs), powdered sugar (about 2 cups), and vanilla (about a teaspoon). I don’t have specific amounts. I blend these to taste. 2012 update: My bro just made these for us; he used maple syrup instead of butter for the frosting. Pumpkin & maple syrup combine to form one fine fall indulgence!

Nuke and Eat Stir Fry
October 1, 2009 by GradingGirl
Filed under Recipes, School's Out
I found this in a past issue of Women’s Health and made it the other night so that I wouldn’t have to worry about making lunches for the week. I just savored my last portion for lunch. I hunt for recipes like this that don’t taste as “clean” as they are. The spices coupled with the fresh veggies and tender beef make for a satisfying meal that provide the right ratio of protein, carbs and fat. This can also make for a perfect post-workout meal or delicious dinner.
An A+ Dinner
NUKE-AND-EAT ASIAN STIR-FRY
Time-saving Tip: Make this recipe on Sunday, then freeze it in single-serving portions—you’ll have a healthy “fast-food: meal ready anytime you want it.
(I modified to make it even cleaner by eliminating extra salt, replacing one egg with two egg whites, and using low-sodium soy sauce.)
- 2 egg whites, beaten
- 4 Tbsp low-sodium soy sauce
- 1 lb beef sirloin, sliced into 2″ strips
- 1 Tbsp sesame oil
- 1 Tbsp cornstarch
- 1/2 tsp crushed red pepper
- 1 Tbsp chopped garlic
- 2 tsp grated fresh ginger
- 2 carrots, sliced into 2″ strips
- 1 8 oz can sliced water chestnuts, drained
- 1 medium onion, sliced
- 1 bunch scallions, sliced into 2″ strips
- brown rice (you can make a batch of this ahead of time as well and portion it along with the stir fry)
In a bowl, combine the egg whites and 1 Tbsp of the soy sauce, and stir well. Then add the sirloin strips and set aside to marinate. Next, heat the oil in a large nonstick skillet while you mix the remaining soy sauce, the cornstarch, and the crushed red pepper in a bowl—this is your sauce, to be used later. Once the skillet is hot, stir-fry the garlic and ginger for about 30 seconds, stirring constantly. Then, at 30-second intervals, individually add the carrots, water chestnuts, onion, and scallions. Next, remove all the vegetables from the skillet and place them in a bowl. Put the beef-marinade mixture in the skillet, cook for 2 to 3 minutes, then pour in the sauce, stirring and cooking until it’s thick and bubbly. Finally, add the vegetables back to the skillet, and cook everything together for a couple of minutes, or until hot.
Let it cool, then place individual portions in plastic containers and freeze. When you’re ready for a quick lunch, microwave the stir-fry for 3 minutes or until hot and serve with one serving of the brown rice. Makes 3 servings
Per serving: 486 calories, 42 g protein (2.2 g leucine), 45 g carbohydrates, 16 g fat, 7 g fiber
GG’s Tip: You can substitute with other veggies you have on hand . . . broccoli, cauliflower, red peppers . . .

Cherry DeLIGHT
August 23, 2009 by GradingGirl
Filed under Recipes, School's Out
An A+ Dessert
A reader asked me why I only post healthful (not healthy) recipes so I decided to post a more decadent dessert that only seems un GG-like. This is actually fat free despite its creamy richness. So go ahead, we all need to splurge once in a while. Everything in moderation . . . including moderation. 🙂
I love all things cherry – I eat marochino cherries out of the jar, cherry lifesavers are my favorite candy, and I pop bing cherries like popcorn. My mother’s Cherry Delight dessert may have been the dish that started it all. I fondly recall racing my dad to the fridge for the last piece of this no-bake treat. I was working out yesterday, of all things, and was trying to think of a way to give this dish an “eat clean” makeover. I had a taste for it and can’t remember the last time I enjoyed it.

Using fresh cherries rather than canned cherry pie filling cuts out the sugar.
GG sits before you now exclaiming that the experiment worked. I have to say it tastes more sinful than it is. This is a great warm weather dessert that’s always been a crowd pleaser in our family. If you like sweet, if you like creamy, and if you like cherry, check this out. It’s real simple and quick to whip up (unless you’re feeling the urge to make your own angel food cake, like I did):
Cherry DeLIGHT
- Angel Food cake, cut into small cubes (homemade or store bought) ****Don’t forget, there are no egg yolks in angel food cake. That means no fat!!***
- 2 packages sugar-free vanilla instant pudding mix (original recipe calls for regular vanilla instant pudding mix)
- approx. 2 cups of pitted Bing cherries (original recipe calls for 2 cans of cherry pie filling) **my favorite cherry pitter is from Williams Sonoma
- 1 cup non-fat plain Greek yogurt (original recipe calls for one pint sour cream)
In a 9 x 13 pan, spread half of the cubed Angel Food cake on the bottom. Make the pudding according to package directions (use skim milk). Mix the yogurt with the pudding. Layer half of the pudding mixture on top of the broken cake in the pan. Place the second half of the cake cubes on top of the pudding. Layer the second half of the pudding on top of that. Place the cherries on top. Refrigerate for at least 4 hours. That’s it!
There you have it ~ a family recipe made over into a non-fat decadent dessert!!!!
Breakfast in a Blender
April 27, 2009 by GradingGirl
Filed under Recipes, School's Out
GG’s Power Protein Shake = A+
I make this at least three mornings a week. It’s my favorite Saturday breakfast right before going to the gym for a nice long weekend workout. It tastes much more sinful than it is. It only takes a couple of minutes from start to clean up too. I’ve also varied this with frozen strawberries and a scoop of strawberry whey protein for a different treat. Go ahead ~ put that blender to use.

GG’s Power Protein Shake
1 frozen banana
1/3 cup oatmeal
2/3 cup water
1 scoop vanilla, cookies n cream, or graham cracker flavored whey protein powder
1 tbs oat bran
1 tbs flaxseeds and 1 tbs chia seeds
1.5 tbs wheat germ2 tbs natural applesauce
**When I really feel like getting my greens, I add a handful of baby spinach and/or mustard greens. It mixes well and tastes surprisingly good with the banana!!!
A small scoopful of iceBlend all ingredients in a blender until smooth. Breakfast in a blender!
(Ba)Nana Bread
April 18, 2009 by GradingGirl
Filed under Recipes, School's Out
New ‘Nana Bread = A+
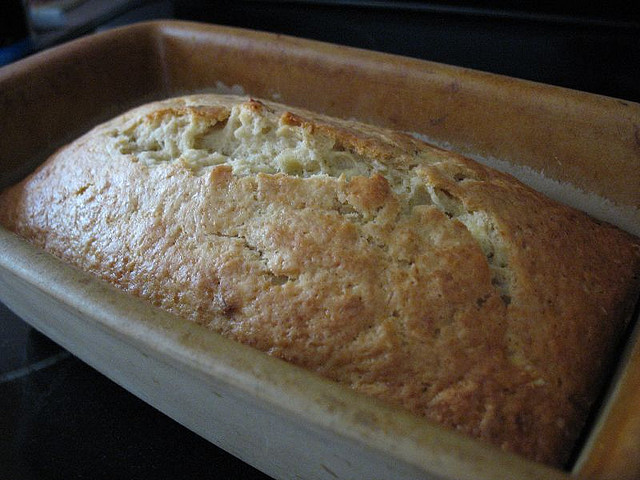
What’s a (grading) girl like myself to do when I come home from a great workout with papers ready to grade, new blog pages ready to fill, and a sweet tooth that won’t subside. Well, I found a solution this evening that won’t waste those hours at the gym. I’ve been searching for a healthier banana bread recipe in fitness and nutrition magazines, but never discovered one quite as delicious as the original; the alternatives are either too dry or bland. Thankfully, my sister-in-law solved this dilemna with her latest kitchen experiment – it takes the grade, peeps! Moist and sinfully sweet as dessert yet happily healthy as whole grain. Mmmm . . . this aroma makes the words fly out of my fingertips. . . Try this – no guilt required.
New (Ba)Nana Bread ~
Sift the dry ingredients:
– 1 1/2 cups whole wheat flour, 1/2 cup all-purpose flour (original = 2 cups all purpose flour)
– 2 teaspoons baking soda
– 1/4 teaspoon saltMash :
– 3 or 4 ripe bananas
– 1 tablespoon milk
– 1/2 cup blackberries (this addition is key!)Mix the following in this order:
– 1/2 stick melted butter (original = 1 stick)
– 1/2 cup Truvia or Splenda blend (original = 1 cup sugar)
– 1 egg, 2 egg whites (original = 2 eggs)
– 1 teaspoon vanillaAdd the dry ingredients and the mashed banana mixture alternatively to the butter mixture, beginning and ending with the dry ingredients.
Bake in a sprayed loaf pan @ 350 degrees for 1 hour, 10 minutes.
Delish!