
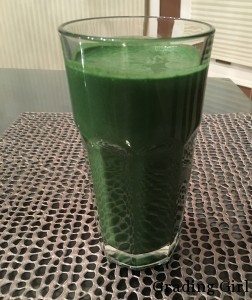
St. Patrick’s Day Smoothie
March 16, 2016 by GradingGirl
Filed under Recipes
It doesn’t get much greener than this!!
What makes this smoothie so healthful and energizing is the not-so-secret-anymore spirulina!! Have you heard about this multi-vitamin?! All it takes is one teaspoonful a day to boost immunity, increase energy and support cardiovascular, eye and brain health.
I teach for three consecutive class periods in the early morning, which means I must be on and ready to go. This smoothie not only tastes better than coffee, it’s a healthy, natural alternative to caffeine. It leaves me satisfied and energized for that first essential half of the day!
Try this combination and you won’t even realize you’re drinking healthfully ~ it’s just too delicious!
Coconut Almond Green Smoothie
- 1 tsp Spirulina
- 2 tbs raw almond butter
- 2 cups spinach
- 1 frozen banana OR 1 avocado (if you don’t want all the sugar)
- 2 tbs unsweetened shredded coconut
- 2/3 cup filtered water
Mix all of the above in a Vitamix or blender, and enjoy!!!!
#EatCleanforEducators
#GradingGirl
Cala Lillies
April 4, 2012 by GradingGirl
Filed under Recipes, School's Out
Here is a recipe I traditionally make for Easter gatherings. My cousin affectionatey nicknamed them “deformed twinkies,” and that is exactly the color and consistency of the cake portion. They are called Cala Lillies, however, because of the similar (easy to hold) shape to the flower. Every time I bring a platter of these light and airy gems, they disappear within minutes of landing on the serving table. Check these out for a different spring treat.

Cala Lillies
CAKE PORTION:
~ 3 eggs
~ ¾ Cup sugar
~ 1 Cup flour
~ 1 tsp. baking powder
~ 1 tsp. vanilla
FILLING:
1 carton of whipping cream
Preheat oven to 400 degrees.
Mix the eggs until they are frothy (this is one of the most important parts – mix on a high speed for a few minutes)! Add the sugar, flour, baking powder and vanilla. Beat the entire mixture on low for two minutes.
Drop by teaspoonful onto a greased baking sheet – only six on one sheet at a time; also, place only one sheet in the oven at a time. This will allow you just enough time to “pinch” the ends together when the little ‘lillies’ come out of the oven. (Any more than six, and the dough will cool too much to form the shape properly.)
Place in the oven for five minutes. Immediately take them off of tray with a spatula and pinch the ends together so that they look like cala lillies.
Place whipped cream inside of them. By the way, sprinkle a sparkle of sugar and a dash of vanilla into your whipped cream right before it reaches its perfect consistency . . . great way to add extra taste to the cream. May also garnish with one thin piece of pineapple in the middle of the whipped cream to emulate the yellow spadix in the middle of the flower.
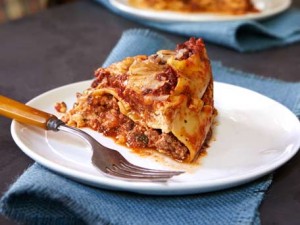
BEST Slow-Cooked Turkey Lasagna
January 1, 2012 by GradingGirl
Filed under Recipes, School's Out
A slow-cooked meal is a gift from your early self to your later self. This one makes the house smell extra scrumptious.
I made this for the first time this Christmas season. I discovered it in my latest issue of “Muscle and Fitness Hers” (Jan/Feb issue) so you know it’s healthful!! My family members tried something new this year. Rather than exchange material gifts (except for the young ones, of course), we took turns preparing special dinners for each other. Here is what I decided to make . . . it is a definite repeater. It is, in fact, the best lasagna I’ve made – and it’s healthful, on top of it!!
Slow-Cooked Turkey Lasagna
~ 6 – 8 whole wheat or whole grain lasagna noodles
~ 12 oz 99% fat free ground turkey
~ 1/4 cup red cooking wine
~ 1/2 cup fat-free cottage cheese
~ 1/4 cup grated Parmesan cheese
~ 1 cup low-fat ricotta cheese
~ 6 oz low-fat part skim mozzarella cheese
~ 6 oz can tomato paste
~ 29 – 32 oz tomato sauce
~ 1 cup chopped white onion
~ 2 tsp minced garlic cloves
~ 2 tbsp dried parsley (divided)
~ Mrs. Dash to taste (or whatever spices you have on hand!!)
~ 1/8 tsp ground nutmeg
1. Heat large sauté pan over medium heat. Cook ground turkey, onion, and garlic until turkey is browned.
2. Add tomato paste, tomato sauce, Mrs. Dash and 1 tbsp of parsley to meat mixture.
3. Simmer for a few minutes on low. Remove from heat. Stir in cooking wine and set aside.
4. In another bowl, combine all cheeses with remaining parsley and nutmeg.
5. Spoon one layer of turkey mixture across bottom of slow cooker.
6. Add one layer of dry lasagna noodles (you will need to break them to fit in slow cooker)
7. Add a layer of cheese followed by a layer of cooked turkey.
8. Repeat steps 5 – 7.
9. Top lasagna with a pinch of parsley, cheese, and 1 – 2 tbsp of red cooking wine.
10. Cook on low in slow cooker for 7 – 8 hours.
Baked Pasta with Chicken Sausage – DELIZIOSO DISH!
April 1, 2011 by GradingGirl
Filed under Recipes
I’ve been making this dish since I found it in Martha Stewart’s Everyday Food a few years ago. I make it often for special people in my life! I’ve cleaned it up by replacing the heavy cream in the sauce with fat free half & half – it tastes just as scrumptious. Buon appetito!!!!
Baked Pasta with Chicken Sausage
– 16 oz rigatoni (whole grain or wheat)
-1 tbsp olive oil
-1 medium red onion, chopped
-4 cloves garlic, minced
-1/4 cup vodka (optional)
–1 can (28 oz.) whole tomatoes with juice, lightly crushed with hands
-1/2 tsp dried oregano
–1/2 cup fat free half & half
-10 ounces baby spinach
-12 ounces chicken sausage, halved lengthwise & sliced 1/4 inch thick (I use apple chicken sausage)
-6 ounces fontina cheese (4 ounces cut into 1/2 inch cubes and 2 ounces coarsely grated)
-1/4 cup grated parmesan cheeseDirections:
1. Boil a large pot of salted water. Once boiling, add pasta and cook until al dente, according to package directions. Add spinach, cooking just until wilted. Drain and return contents to pot.
2. While water is coming to a boil, heat oil is a separate skillet over medium heat. Add chopped onion, cooking until translucent (approximately 3 minutes). Stir in garlic. Remove skillet from heat, stir in vodka, and return to heat, cooking until almost evaporated (about 1 minute).
3. Stir in tomatoes and oregano, cooking for 10-15 minutes, until tomatoes are falling apart. Add half & half and cook until warmed through (5 minutes). Season with salt and pepper.
4. Add tomato sauce, sausage, and the cubed cheese to the large pot with the pasta. Toss with a large spoon to coat. Season with salt and pepper. Divide into baking dishes (I use one 9 x 13 and one 8-inch square). Top with remaining shredded cheese and parmesan. Bake at 400 degrees until browned and crisp (20-30 minutes).**To freeze–prepare dish (except the extra cheese on top) and let it cool. Cover with plastic wrap and freeze. To bake, do not thaw. Remove from freezer, take off plastic wrap, cover with foil, and bake at 400F for 1 1/2-1 3/4 hours. Remove foil, top with additional cheese, and bake for 20-30 more minutes. It truly tastes just as delicious from frozen!!

Homemade Red Velvet Cake
February 11, 2011 by GradingGirl
Filed under Recipes, School's Out
My mother was way ahead of the times. She started baking red velvet cake when I was a little girl years ago. At family parties, it commanded many ooos and ahs, and disappeared instantaneously. As we grew, she stopped making as many desserts as she used to and red velvet cake became a distant taste. Red velvet, in the meantime, has made quite a name for itself these days. Sprinkles in Beverly Hills started it all with their amazing, infamous Red Velvet Cupcakes! Well, since my brother and I inhaled many a cupcake from Sprinkles and other cupcake cuties, we asked her to resurrect the recipe this past Christmas so that we could taste and discover just how well our mother’s recipe held up against today’s contenders. The verdict? Hands down – my mother’s is more moist and light. Trust me, my bro and I are both critical and if our own mother’s food was not as flavorful than the famous facsimiles, we would stand and say. If you are at all able in the kitchen, this is worth the labor . . . especially during the Christmas or Valentine season. I will still frequent Sprinkles and cherish every bite; but, this is one recipe that illustrates there’s no food like homemade.
Red Velvet Cake
CAKE:
(2 round 8 ” cakes)
~ 4 1/2 oz bottles of red food coloring
~ 1/2 cup shortening, softened and creamed
~ 2 tbs. cocoa (sweetened)
~ 1 1/2 cup sugar
~ 2 eggs
~ 1 cup buttermilk
~ 2 1/4 cups cake flour, sifted 3 times
~ 1 tsp. vanilla
~ 1 tbs. vinegar
~ 1 tsp. baking soda
~ 1 tsp. saltPreheat oven at 350°. Mix the food coloring with the cocoa, creamed shortening and sugar. Add the eggs. Blend in the buttermilk, the sifted cake flour, and the salt. Once this is blended well, add the vanilla. Next, add the vinegar and baking soda. Bake in two well greased and floured 8″ round cake pans for 30-35 minutes.
CREAM CHEESE FROSTING:
(makes 3 cups)
1/2 cup (1 stick) unsalted butter, at room temperature
6 ounces cream cheese, at room temperature
1 tsp. vanilla extract
3 cups powdered sugarIn a large bowl, using an electric mixer on low speed, beat the butter, cream cheese, and vanilla until smooth and thoroughly blended, about 1 minute. Stop the mixer and scrape the sides of the bowl as needed during mixing.
Add the powdered sugar, mixing until smooth, about 1 minute, then beat on medium speed for 1 minute to lighten the frosting further. The frosting is ready to use, or for flavor additions.
Once the cakes are cool, frost the top of one and place the second one on top of that. Now, frost away on the rest of the cake! The more frosting the better!!!!

World’s Fastest Disappearing Dessert
January 11, 2011 by GradingGirl
Filed under Recipes, School's Out
Need a fast crowd pleaser?? Even the kitchen illiterate can master this one . . .
With 38 of us (including T.A.’s) in the English department, there’s always food in the office. We celebrate birthdays and “half” birthdays (for those born in the summer) by taking turns bringing in a small spread usually consisting of cake and/or snacks or lunch. A dear, close colleague is retiring this year and we requested to host each other’s birthdays since we won’t be able to again. 🙁 Her birthday is approaching and below is the cake she requested. Every time I make this, this is gone by Period 3 of an 8-period day!!!
To satisfy 38 hungry intellectuals, I’ll be making this along with Crème de Menthe Brownies
and Chicken Sausage Pasta with Vodka Creme Sauce (ask me for this recipe!).
Notice a theme?!
Warning: This is not an Eat Clean recipe!!!!!
Amoretto Cake
Cake:
- 1 Vanilla Cake Mix
- 1 Instant Vanilla Pudding mix
- 1/2 cup Orange Juice
- 1/2 cup Amoretto
- 1/2 cup Oil (I use Vegetable or Corn)
- 4 eggs
Glaze:
- 1 cup Powdered Sugar
- 2 tbs. Orange Juice
- 2 tbs. Amoretto
Mix the cake ingredients and place in a greased bundt pan. Bake according to the cake mix directions. While cake is baking, mix the glaze ingredients and set aside. Once the cake has cooled, pour on the glaze. Voilà
This cake is so moist that some like it without the glaze as well.
. . . thank you to my dear Aunt Adelle for the recipe long ago.
I Scream, You Scream, We ALL Scream for Ice Cream
July 17, 2010 by GradingGirl
Filed under Recipes
Blue Moon Ice Cream
I recently stayed overnight at the Grand Geneva Resort in Lake Geneva, WI and enjoyed a sweet treat I haven’t tasted since, well, since the last time I was in Lake Geneva about 6 years ago . . . Blue Moon ice cream!!! Apparently, it’s only available in upper areas of the Midwest – Michigan, Minnesota and Wisconsin. As I sat savoring the indulgence, I attempted to identify just what is Blue Moon ice cream. Coupled with its refreshing sky blue hue, it has a hard-to-describe taste all its own. After happily testing my analysis over and over and over again, I decided it definitely had a hint of lemon with a touch of raspberry. When I returned home, I frantically searched online and discovered the “original” recipe is a secret but there are two recipes out there that come close. I dug out my ice cream maker, tried the one I’ve listed below and – sure enough – it is VERY close!!! Oh . . . and I was right about the lemon and raspberry!!

Blue Moon ice cream = blue tongues! Fun!
This is definitely a repeater in my house. The blue color is a refreshing pretty touch! For next year’s 4th of July party, I’ll serve this in tall clear ice cream dishes with fresh raspberries and homemade whipped cream on top. Voilà – a deliciously indulgent red, white and blue treat!! 🙂
Blue Moon Ice Cream
1/2 cup milk
1/2 cup sugar
1/4 teaspoon salt
1/2 cup half-and-half
1/2 teaspoon vanilla extract or vanilla oil (I used extract)
1 1/2 cups whipping cream
1/8 teaspoon blue food coloring
3 teaspoons vanilla pudding mix
1 teaspoon raspberry flavored oil or 1 cup frozen raspberries, pureed (I pureed fresh raspberries)
1 teaspoon lemon flavored oil or lemon extract (I used fresh lemon juice)Directions:
-1/2 Cup of milk scalded in pan.
-add 1/2 cup of sugar and 1/4 tsp of salt. stir till dissolved
-add 1/2 cup of half and half.
-add 1 1/2 cups of heavy whipping cream.
-add vanilla, raspberry, lemon flavoring.
-add blue food coloring.
-chill in fridge till very cold.
-put in ice cream machine for about 20 minutes and devour!
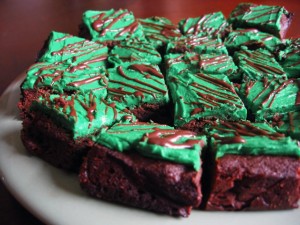
Marvelous Mint Chocolate Brownies!
December 16, 2009 by GradingGirl
Filed under Recipes, School's Out
Who doesn’t love brownies?! I’m kind of famous for these at work. If I don’t make them at least twice a year, I lose tenure! 🙂 My dear friend, Mary, gave this recipe to me years ago back when we were next-door neighbors. I’ve been making them ever since. WARNING: These are ooey, rich and gooey – addiction is imminent.
I apologize to my clean-eating followers. This is NOT an eat-clean dessert. Hey, we have to splurge once in a blue moon!
Mint Chocolate Brownies!!!
These are richly delicious!!! Make them for Christmas & St. Patrick’s Day!
Ingredients ~
* Brownie Mix
* 1 ½ stick butter (I use unsalted)
* 3 Tbs. Crème-de-Menthe
* 2 Cups Powdered Sugar
* 1 Cup Chocolate Chips (or Mint Chocolate Chips)
* 1 package Andies thin mint candy
Brownies:
Bake and cool your favorite brownie mix according to package instructions. (13 x 9 pan) I like Duncan HinesCool completely before spreading the crème-de-menthe layer. DO NOT CUT.Crème-de-menthe layer:
Beat ½ cup room temperature butter. Add 2 cups powdered sugar and 3 Tbs. green crème-de-menthe liquor. Spread over brownies. Let this set before spreading the chocolate glaze.Chocolate glaze:
Stir 1 cup semi-sweet chocolate chips (or mint chocolate chips for more mintness!) and 6 tbs. butter in a saucepan over low heat until melted and smooth. COOL. Pour over crème-de-menthe layer and spread evenly.Before glaze sets, sprinkle with coarsely chopped Andies candy. Enjoy!!
Good Dessert, Bad Dessert
November 15, 2009 by GradingGirl
Filed under Recipes, School's Out
I made this last night for tonight’s dessert. It is actually good for you while tasting indulgently yummy! I can’t take the credit for this concoction. I stumbled upon the recipe in the November/December 2009 issue of Clean Eating – GG’s favorite cooking magazine, by the way!!! It took me all of five minutes to mix all the ingredients in my blender. This is my “good dessert” for the evening:
Spiced Pumpkin Mousse
Serves 10 (I cut this recipe in half.)
This luscious dessert contains 35% of daily rec for manganese and 15% for fiber!
- 2 15 oz. cans 100% pure pumpkin purée (not pumpkin pie filling)
- 1 1-lb pkg silken tofu, drained well
- 1/2 cup pure maple syrup (I used sugar-free)
- 1 1/2 tsp cinnamon, ground
- 3/4 tsp ginger, ground
- 1/4 tsp nutmeg, ground
- 1/4 tsp cloves, ground
- 1/4 tsp sea salt (I eliminated this ingredient)
- 1/2 cup nonfat plain Greek-style yogurt (I used my very fave 0% Fage!)
- 1 oz dark chocolate, cut into thin shards
In the bowl of a food processor (I used my blender), combine pumpkin and tofu. Process until combined, about 30 seconds. Add maple syrup, cinnamon, ginger, nutmeg, cloves and salt. Process until combined, about 30 seconds more.
Transfer mousse to a resealable container, cover and refrigerate for at least 4 hours.
Drain any water that has accumulated from mousse. Give it a quick stir and scoop 1/2 cup mousse into each of 10 small glasses or ramekins. Top each serving with 2 tsp yogurt and 1 tsp chocolate. Keep refrigerated until ready to serve. (for those extra sweet tooths, fat free Cool Whip works well too)

This tastes like a very gooingly good pumpkin pie without the crust and more of the scrumptious filling!!
Now, my daughter’s palate does not yet appreciate consistently clean eating as I’ve grown to love; her younger metabolism can afford more cheats. Soooo . . . being the wanting-to-please everyone cook that I strive to be, I’m making this “bad dessert” tonight as well:
Thank you to my very kitchen-capable bro who introduced me to this easy sweet treat!
Pizzookies!
Serves 4
- 1 package Nestle Toll House Chocolate Chip Cookie Dough
- Vanilla or Caramel Cheesecake ice cream
Place the cookie dough as one sheet in an 8 X 8 pan. Bake according to package directions.
Immediately warm out of the oven, divide the cookie into four parts. Place each warm “cookie” in a large bowl. Scoop the ice cream on top and serve immediately! Hmmmmmm . . . . .

Cookies that Won’t Turn You Into a Pumpkin
October 19, 2009 by GradingGirl
Filed under Recipes, School's Out
This is one of my favorite desserts of the fall and winter seasons. Pumpkin is so good for you! Not only is pumpkin loaded with vitamin A and antioxidant carotenoids, but it’s also a good source of vitamins C, K, and E along with lots of minerals including magnesium, potassium, and iron. Wooo . . . that’s alot of punch to this bright orange veggie. My mom has been making these cookies for as long as I can remember; she, however, makes the delectable original version. Here’s my slightly “doctored,” eat clean version that tastes just as sinful. I’ve included the original as well.
Old Fashioned Soft Pumpkin Cookies
- Mmm, one of my faves of the season!
- 1 tsp baking powder
- 1 tsp ground cinnamon
- ½ tsp ground nutmeg
- 1/4 tsp salt
- 1/2 cup butter, softened (2012 update: my bro used pumpkin butter which made the cookie denser)
- 1 can (15 ounces) pumpkin
- 1 1/2 cup sugar
- 2 egg whites (original 1 egg)
- 1 tsp vanilla
Combine flour, baking soda, baking powder, cinnamon, nutmeg, and salt in a medium bowl. Mix butter, pumpkin, egg and vanilla in another bowl. Beat until light and creamy. Mix dry ingredients until well blended with the pumpkin mixture.
Drop by rounded tablespoons onto a greased cookie sheet. Smooth tops of cookies.
Bake at 350 degrees for 15-20 minutes.
Cool on wire racks.
**Drizzle with your favorite homemade vanilla frosting recipe.
( I combine skim milk (about ½ cup), butter (about 2 tbs), powdered sugar (about 2 cups), and vanilla (about a teaspoon). I don’t have specific amounts. I blend these to taste. 2012 update: My bro just made these for us; he used maple syrup instead of butter for the frosting. Pumpkin & maple syrup combine to form one fine fall indulgence!

Nuke and Eat Stir Fry
October 1, 2009 by GradingGirl
Filed under Recipes, School's Out
I found this in a past issue of Women’s Health and made it the other night so that I wouldn’t have to worry about making lunches for the week. I just savored my last portion for lunch. I hunt for recipes like this that don’t taste as “clean” as they are. The spices coupled with the fresh veggies and tender beef make for a satisfying meal that provide the right ratio of protein, carbs and fat. This can also make for a perfect post-workout meal or delicious dinner.
An A+ Dinner
NUKE-AND-EAT ASIAN STIR-FRY
Time-saving Tip: Make this recipe on Sunday, then freeze it in single-serving portions—you’ll have a healthy “fast-food: meal ready anytime you want it.
(I modified to make it even cleaner by eliminating extra salt, replacing one egg with two egg whites, and using low-sodium soy sauce.)
- 2 egg whites, beaten
- 4 Tbsp low-sodium soy sauce
- 1 lb beef sirloin, sliced into 2″ strips
- 1 Tbsp sesame oil
- 1 Tbsp cornstarch
- 1/2 tsp crushed red pepper
- 1 Tbsp chopped garlic
- 2 tsp grated fresh ginger
- 2 carrots, sliced into 2″ strips
- 1 8 oz can sliced water chestnuts, drained
- 1 medium onion, sliced
- 1 bunch scallions, sliced into 2″ strips
- brown rice (you can make a batch of this ahead of time as well and portion it along with the stir fry)
In a bowl, combine the egg whites and 1 Tbsp of the soy sauce, and stir well. Then add the sirloin strips and set aside to marinate. Next, heat the oil in a large nonstick skillet while you mix the remaining soy sauce, the cornstarch, and the crushed red pepper in a bowl—this is your sauce, to be used later. Once the skillet is hot, stir-fry the garlic and ginger for about 30 seconds, stirring constantly. Then, at 30-second intervals, individually add the carrots, water chestnuts, onion, and scallions. Next, remove all the vegetables from the skillet and place them in a bowl. Put the beef-marinade mixture in the skillet, cook for 2 to 3 minutes, then pour in the sauce, stirring and cooking until it’s thick and bubbly. Finally, add the vegetables back to the skillet, and cook everything together for a couple of minutes, or until hot.
Let it cool, then place individual portions in plastic containers and freeze. When you’re ready for a quick lunch, microwave the stir-fry for 3 minutes or until hot and serve with one serving of the brown rice. Makes 3 servings
Per serving: 486 calories, 42 g protein (2.2 g leucine), 45 g carbohydrates, 16 g fat, 7 g fiber
GG’s Tip: You can substitute with other veggies you have on hand . . . broccoli, cauliflower, red peppers . . .

Cherry DeLIGHT
August 23, 2009 by GradingGirl
Filed under Recipes, School's Out
An A+ Dessert
A reader asked me why I only post healthful (not healthy) recipes so I decided to post a more decadent dessert that only seems un GG-like. This is actually fat free despite its creamy richness. So go ahead, we all need to splurge once in a while. Everything in moderation . . . including moderation. 🙂
I love all things cherry – I eat marochino cherries out of the jar, cherry lifesavers are my favorite candy, and I pop bing cherries like popcorn. My mother’s Cherry Delight dessert may have been the dish that started it all. I fondly recall racing my dad to the fridge for the last piece of this no-bake treat. I was working out yesterday, of all things, and was trying to think of a way to give this dish an “eat clean” makeover. I had a taste for it and can’t remember the last time I enjoyed it.

Using fresh cherries rather than canned cherry pie filling cuts out the sugar.
GG sits before you now exclaiming that the experiment worked. I have to say it tastes more sinful than it is. This is a great warm weather dessert that’s always been a crowd pleaser in our family. If you like sweet, if you like creamy, and if you like cherry, check this out. It’s real simple and quick to whip up (unless you’re feeling the urge to make your own angel food cake, like I did):
Cherry DeLIGHT
- Angel Food cake, cut into small cubes (homemade or store bought) ****Don’t forget, there are no egg yolks in angel food cake. That means no fat!!***
- 2 packages sugar-free vanilla instant pudding mix (original recipe calls for regular vanilla instant pudding mix)
- approx. 2 cups of pitted Bing cherries (original recipe calls for 2 cans of cherry pie filling) **my favorite cherry pitter is from Williams Sonoma
- 1 cup non-fat plain Greek yogurt (original recipe calls for one pint sour cream)
In a 9 x 13 pan, spread half of the cubed Angel Food cake on the bottom. Make the pudding according to package directions (use skim milk). Mix the yogurt with the pudding. Layer half of the pudding mixture on top of the broken cake in the pan. Place the second half of the cake cubes on top of the pudding. Layer the second half of the pudding on top of that. Place the cherries on top. Refrigerate for at least 4 hours. That’s it!
There you have it ~ a family recipe made over into a non-fat decadent dessert!!!!
Happy Healthful Snack
May 22, 2009 by GradingGirl
Filed under Recipes, School's Out
Two A+ Energizing Snacks
As I illustrate in my post on healthful eating shortcuts, I make as many meals and snacks from scratch as I can to avoid unneccesary additives and preservatives. But who has time to spend hours in the kitchen? Working all day, devoting a couple of hours in the evening to a workout, and spending quality time with my daughter leaves little time for much else. I’m forever looking for easy, quick recipes that don’t require a lot of labor. Here are two of my new favorites that I happened upon in one of my favorite fitness magazines, Oxygen. I made these last week, they satisfied my appetite between meals, and they helped to fuel my workouts. These are “repeaters,” as my daughter would say.
TLC’s Trail Mix
1/4 cup raisins
1/4 cup dried cranberries
1/2 cup banana chips
1/2 cup apple chips
1/2 cup almonds
1/4 cup cashews
1/4 cup walnuts
1/2 cup sunflower seeds
1/4 cup carob chips (optional . . . I didn’t have these last time I made this, and it was just as yummy)Combine all ingredients in a large mixing bowl and divide into 1/4 cup servings.
Makes 12 servings
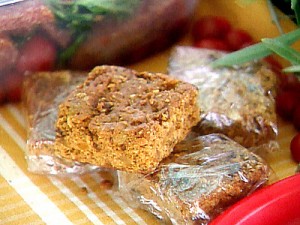
Energy Bars
1 cup natural peanut butter (I used reduced fat)
1 cup honey
1 cup old-fashioned oatmeal
1/2 cup walnuts
1/2 cup almonds
1 cup dried apricots, chopped1. Combine peanut butter and honey in a large nonstick pot and heat on low until runny. Mix in the oatmeal, apricots and nuts, stirring until all ingredients are well coated.
2. Line a 9 x 9 inch pan with waxed paper. Press the mixture into the pan. Let cool, then cut into 16 bars.
Makes 16 servings
Both of these snacks taste more sinful than they are!!!